
There are a number of existing tutorials that outline how to deploy an R Shiny App with Docker. R is great programming language for performing statistical analysis – the community is rich with packages that are finding new uses every day. Shiny is a web frame work for R – you can create a UI for end users to interact with your code in a web browser.
Docker is a platform that can be used to deliver software packages (and dependencies) consistently across different machines. The benefit is that you can have another computer with docker run/reproduce your code without it breaking. Our use case here is having our R code that runs locally also run on a cloud web-server. I highly recommend checking out the documentation – for understanding the essential details.
This guide will highlight the pitfalls and workarounds I ran into when setting up a shiny app via docker.
My PC was running an older build of Windows 10 Home with a Ryzen CPU – this guide will likely be helpful if you have similar specs.
I want to credit the great tutorials from various bloggers that have written on this topic – I’m following their work closely but there are a few edits in the process I need in order to get my build to work:
- https://hausetutorials.netlify.app/posts/2019-03-17-dockerize-a-shinyapp-and-host-it-on-your-own-server-with-digitalocean/
- https://www.bjoern-bos.de/post/learn-how-to-dockerize-a-shinyapp-in-7-steps/
- https://juanitorduz.github.io/dockerize-a-shinyapp/
Install Docker Toolbox
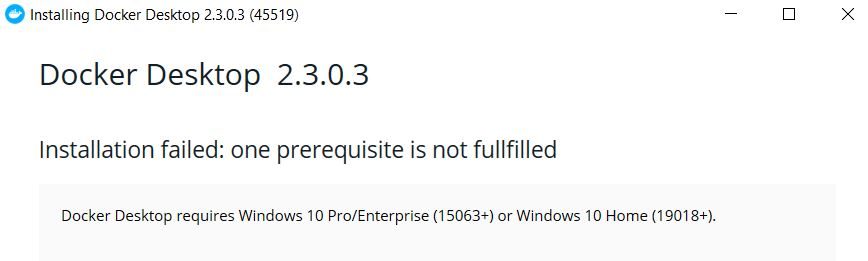
If you’re running an older build of Windows 10 Home Docker Desktop won’t work for you. You might get the error message displayed above. You’ll need to install Docker Toolbox as a work around. In simple terms Docker Toolbox allows you to set up a Linux virtual machine to run docker – you can interact with the virtual machine through the Docker Quickstart Terminal application and the windows command line.
Disable VTX Check
If you have an AMD Ryzen CPU, you might run into an error when trying to launch the Docker Quickstart Terminal application:
This computer doesn't have VT-X/AMD-v enabled. Enabling it in Bios is mandatoryIt’s very likely that you already have virtualization enabled in BIOS, but check anyway. If it is in fact enabled and you still get this message open Windows Power Shell as Admin and run:
docker-machine create default --virtualbox-no-vtx-checkTo ensure docker is correctly set up fire up the Docker Quickstart Terminal. If all goes well you should get an image of a friendly whale.
                        ##         .
                  ## ## ##        ==
               ## ## ## ## ##    ===
           /"""""""""""""""""\___/ ===
      ~~~ {~~ ~~~~ ~~~ ~~~~ ~~~ ~ /  ===- ~~~
           \______ o           __/
             \    \         __/
              \____\_______/


docker is configured to use the default machine with IP xxx.xxx.xx.xxx
For help getting started, check out the docs at https://docs.docker.com


Start interactive shell


username@computer-name MINGW64 /c/Program Files/Docker Toolbox
Run Docker’s Hello World + Get Familiar with Docker + Linux Commands
Get docker hello world with:
docker run hello-worldYou should get a hello message from docker printed to the terminal. Now you’re at a point where you can test out some useful docker commands. I’m listing a few here that I’ve found useful:
Show Running Containers
docker psShow Containers (Including Previously Running Containers)
docker ps -aRun a Docker Image
docker run <image>Stop Running a Docker Image
docker stop <image>Execute a command in a running docker container
docker exec -it <container_id> <command>Examples of executing a command in a running Docker Container:
list contents of directory at a path
docker exec <container_id> cd:/path/to/dir lsview file contents of file in directory
docker exec <container_id> cd:/path/to/file less fileCopy files to docker container
docker cp <src directory> <container_id:path/to/target/dir>Get build details of running docker container
docker exec -it <container_id> lsb_realease -aRemove docker image
docker rm <image>Remove docker container
docker rmi <container_id>Now its Time – Prepare Your Shiny App
On your windows machine you’ll want to create a directory within a folder to house your shiny app. Your_folder should have the following structure:
your_folder:
----app
--------www
------------my_style.css
--------server.r
--------ui.r
----Dockerfile
----shiny-server.conf
----shiny-server.sh
If you’ve created a shiny app before the www folder, server.r and ui.r should be familiar to you.
- The www folder is special folder for css and images that you may want to use in your shiny app.
- server.r defines server logic in R
- ui.r handles ui elements in R
Dockerfile, shiny-server.conf & shiny-server.sh may be new if this is your first time Dockerizing an R Shiny app.
- Dockerfile – this defines a docker image – your telling docker what dependencies to include in your docker image
- shiny-server.conf – this defines your server configuration
- shiny-server.sh – define your log directories and execute shiny-server
Dockerfile
I’ve found it easiest to start by using rocker-org’s shiny + tidyverse packages image – this is what’s happening in the first two lines. Next you want to install system libraries that are of general use and any system libraries that your R packages may require as dependencies. If you get an error referencing an R package and a non-zero error code the R package most likely failed to install because you’re missing one of it’s system dependencies. Check all your R imports and make sure all system library dependencies are installed.
Afterwards install the R packages that you need – a few listed here for example purposes. Notice i put the R sf package install separately so that docker could cache previous steps if an error occurred.
When I do end up building a docker image – it will be from with in the you_folder path on the local PC (i.e. – make sure you’re in that directory when building the image). That way we’re able to copy the app contents, shiny-server.conf and shiny-server.sh to the appropriate directories in the image.
Observe I need to install and use dos2unix to get the shiny-server.sh file to run on the virtual machine. I also copy app contents, expose the port I need and run the unix ready shiny-server.sh file.
# get shiny server plus tidyverse packages image

FROM rocker/shiny-verse:latest


# system libraries of general use

RUN apt-get update && apt-get install -y \

    sudo \

    pandoc \

    pandoc-citeproc \

# I didn’t need both libcurl4-gnutls-dev & libcurl4-openssl-dev so got rid of one

#    libcurl4-gnutls-dev \

    libcairo2-dev \

    libxt-dev \

    libssl-dev \

    libssh2-1-dev \

    curl \

    libcurl4-openssl-dev \

    libxml2-dev \

    libudunits2-0 \

    libudunits2-dev


# some of these are needed for the r sf package to run

RUN apt-get update && apt-get install -y \

#	libudunits2-dev \

	libgdal-dev \

	libgeos-dev \

	libproj-dev \

	libfontconfig1-dev


# Install R Dependencies - installs the r packages you need - if this step fails you’re likely

# missing system libraries that a package requires

RUN install2.r --error \

	rio \

	maps \

	sp \

	maptools \

	housingData \

	leaflet \

	DT\

	shinycustomloader


RUN install2.r --error \

	sf


### -----------------------------------


# copy shiny-server.sh to image

COPY shiny-server.sh /usr/bin/


# copy shiny server config to image

COPY shiny-server.conf  /etc/shiny-server/shiny-server.conf


# copy the contents of app folder to image

COPY ./app /srv/shiny-server/app/


# select port

EXPOSE 80


# allow permission for user ‘shiny’ to run

RUN sudo chown -R shiny:shiny /srv/shiny-server


# install linux programs to enable conversion of ms dos file to unix file

RUN apt-get update && apt-get install -y dos2unix


# we do this so that the shiny-server.sh file is recognized by the linux machine

RUN dos2unix /usr/bin/shiny-server.sh && apt-get --purge remove -y dos2unix && rm -rf /var/lib/apt/lists/*


# Change access permissions to shiny-server.sh - did not need this for my purposes

# RUN ["chmod", "+x", "/usr/bin/shiny-server.sh"]


# run app

CMD ["/usr/bin/shiny-server.sh"]
shiny-server.conf
This file defines the server configuration. The key things to change here are the port number and site directory. In the example below the port number is 80 and root directory is /srv/shiny-server/app – so when we eventually type in the URL we will not need to specify any ‘/’ or sub directories. If we specified a level up, for example /srv/shiny-server our url would need to be appended with /app.
# Define the user we should use when spawning R Shiny processes
run_as shiny;


# Define a top-level server which will listen on a port
server {
  # Instruct this server to listen on port 80. The app at dokku-alt need expose PORT 80, or 500 e etc. See the docs
  listen 80;


  # Define the location available at the base URL
  location / {


    # Run this location in 'site_dir' mode, which hosts the entire directory
    # tree at '/srv/shiny-server/app'
    site_dir /srv/shiny-server/app;

    # Define where we should put the log files for this location
    log_dir /var/log/shiny-server;

    # Should we list the contents of a (non-Shiny-App) directory when the user
    # visits the corresponding URL?
    directory_index on;
  }
shiny-server.sh
In this file we tell shiny server where and how to log and tell shiny server to start.
#!/bin/sh


# Make sure the directory for individual app logs exists
mkdir -p /var/log/shiny-server
chown shiny.shiny /var/log/shiny-server


if [ "$APPLICATION_LOGS_TO_STDOUT" != "false" ];
then
    # push the "real" application logs to stdout with xtail in detached mode
    exec xtail /var/log/shiny-server/ &
fi


# start shiny server

exec shiny-server 2>
Build your docker image
From Docker Quickstart Terminal cd into your_folder. Then build a docker image with:
docker build -t your_app_name .Get Your Virtual Machine’s IP Address
You should get an ip address along the lines of xxx.xxx.xx.xxx – this is what you need to type into the browser once you’re ready to run your app.
docker-machine ip defaultRun Your Docker Image
After you build your image and have your IP, run your image with (80 is the port we specified earlier in the Dockerfile and shiny-server.conf files and make sure it matches whatever port you specify)
docker run -p 80:80 your_app_nameNow head over to the ip you got earlier (include :port# if it’s anything other than 80). Your shiny app should run – test it out and ensure it works.
Turn your Dockerfile into a tarball file
docker save -o <filename>.tar <image>Now you can upload this tarball to the cloud host of your choice. If the host has a docker image available you can run your image in detached mode – your shiny app will be available in your browser at your cloud server’s IP.